This section is where you accrue new invoices for payment.
Complete the following form to set up an accrual invoice:
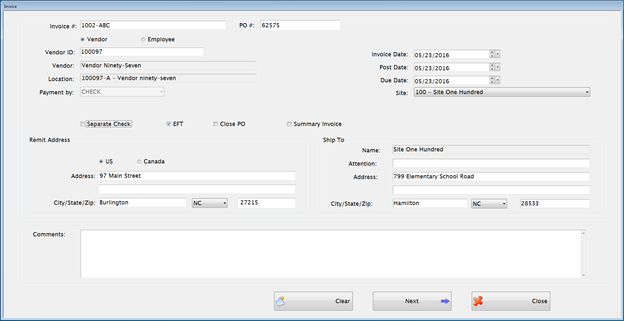
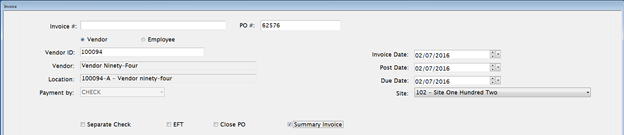
Enter the invoice number provided on the invoice from the vendor in the Invoice # field.
Enter the Purchase Order number from the PO # text field if the invoice is to be attached to a Purchase Order.
The Vendor radio button is the default invoice type so it is already selected.
VendorID, VendorandLocationwill be automatically filled in according to the Purchase Order number that is typed in, but can be updated.
o If there is no Purchase Order for an invoice, it can be accrued without referencing a PO if local policy permits. You will need to enter more data as part of invoice accrual since it has not been entered previously.
Invoice Date, Post Date, Due Date and Site will be automatically filled in from the Purchase Order but can be edited.
o Invoices can have any Invoice Date or Due Date as long as the fiscal month is open.
Check the Separate Check, EFT and/or Close PO box(es) if applicable to invoice.
After each section is complete, click Next to continue to the invoice details screen
Adding and modifying invoices lines is done here. If the invoice you are creating is attached to a purchase order:
Compare the PO information on this form to the invoice being accrued and revise if necessary.
 NOTE: If the
order is complete and the amounts and quantities all match the order,
just enter the Tax amount and click Save to complete the
invoice accrual.
NOTE: If the
order is complete and the amounts and quantities all match the order,
just enter the Tax amount and click Save to complete the
invoice accrual.
o If an item is missing completely, change the Inv. Quantity to zero.
If more detailed corrections are needed, double-click any detail row to edit the invoice.
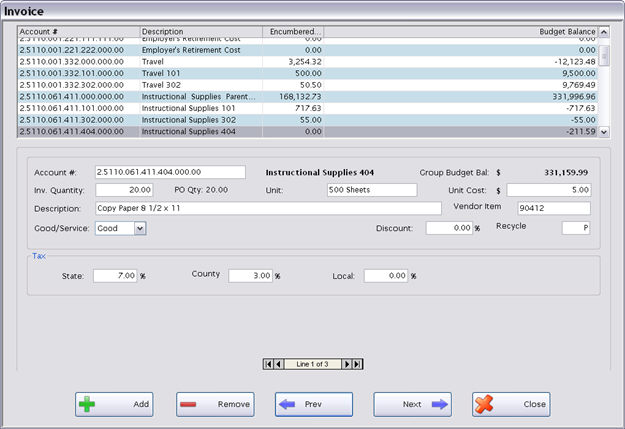
Any of the information can be edited, including the account number. Valid expense accounts are shown in the upper grid but any valid account can be entered.
o Use
the browse bar  to
select a different line if the invoice has multiple lines.
to
select a different line if the invoice has multiple lines.
Click
the 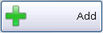 button
or the
button
or the 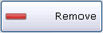 button
to Add a new row or Remove the selected row.
button
to Add a new row or Remove the selected row.
When adding lines to an Invoice, you can use the + key on your keyboard to add a new line instead of having to tab to or click on the Add button with the mouse.
Click
the  button
to edit invoice dates or addresses, if necessary.
button
to edit invoice dates or addresses, if necessary.
Click the  button
to go back to the Summary screen to complete the Invoice.
button
to go back to the Summary screen to complete the Invoice.
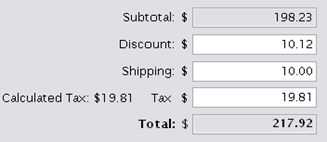
On the final screen, be sure the Subtotal matches the amount due for this invoice.
Enter Discount and Shipping amounts if applicable.
Enter the Sales Tax amount from the invoice in the Tax field.
 Special
notes about Sales Tax calculations:If the Tax on the invoice does not
match the Calculated Tax shown, the system will automatically accrue
an invoice to the State Tax Vendor. Check to be sure that all tax
information has been entered correctly before you save the invoice.
Special
notes about Sales Tax calculations:If the Tax on the invoice does not
match the Calculated Tax shown, the system will automatically accrue
an invoice to the State Tax Vendor. Check to be sure that all tax
information has been entered correctly before you save the invoice.
o The Sales Tax invoice number will have –ST appended to the original invoice number. (If that number has already been used, it will append an additional digit to make it unique –ST1, etc.)
o The Sales Tax invoice will have only one detail line with QTY = 1; the amount will be equal to the amount due (or credit amount).
Click Save to post the Invoice Accrual.
After the invoice is saved, the  button appears. There are two tabs of information here. Quick Print is available for both tabs.
Auditing Tab – Shows changes made to invoice lines, by whom, and when.
Journal Entries Tab – Shows how the invoice lines posted to account codes.
• Upload or Scan any documents that you want attached to the invoice in the Document Cabinet  .
.
Click
the  button
if the invoice is not over budget, and no approval is required. It
will be available for payment under Process Payments.
button
if the invoice is not over budget, and no approval is required. It
will be available for payment under Process Payments.
o Approval is only required on invoices that are over budget. A user with rights to Manage Invoice will need to process it before it can be paid.
When adding an invoice against a PO, you can choose to pay the invoice in summary by checking the Summary Invoice box.
The PO will be summarized by account code and you can enter the dollar amount for each account this invoice is paying. The PO will be unencumbered for the amounts listed if an encumbrance remains on that account.
Once a PO is paid in Summary, all remaining invoices against that PO must also be paid in summary.

Enter the invoice number provided on the invoice from the vendor in the Invoice # field.
Click on the Employee option.
Select the Employee name from the Employee dropdown or use the Search button to find the employee.
Select Payment by: type.
Enter the Invoice Date, Post Date, Due Date and Site.
Invoices can have any Invoice Date or Due Date as long as the fiscal month is open.
©2019 EMS LINQ, Inc.
Fund Management, revised 03/2019