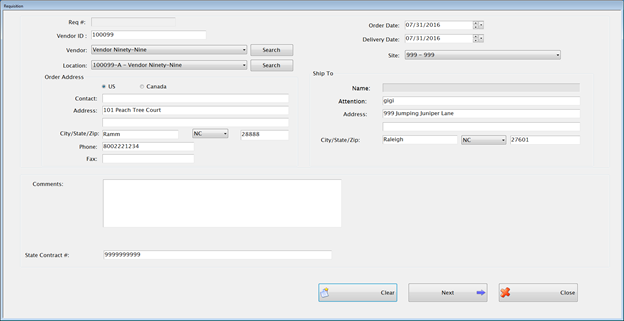
Every order starts with a Requisition. Once a requisition is approved it becomes a Purchase Order.The system will automatically take you through the process to enter a new requisition.
Complete the following form to create a new requisition:
The Req # will remain blank until the requisition is saved.
Enter an ID number in the Vendor ID text field.
Select the Vendor and Vendor Location from their dropdown lists.
o Only active vendors and locations are displayed in the dropdown list or available in Search.
Select the OrderDate and Delivery Date in their respective fields.
Select the Site for this requisition from the site dropdown list.
Click Next to continue to the detail screen.
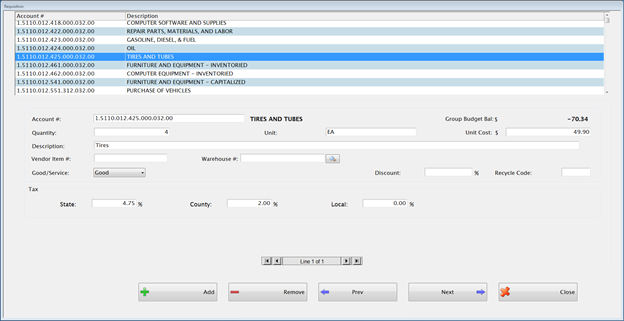
Enter an Account # in the Account # field or highlight an account within the grid to select it for the first line.
o All expense accounts except those marked as Payroll are displayed in the grid at the top.
o If you need to use a Payroll account you can key it in. A warning will appear but the account can still be used.
Enter the Quantity, Unit and Unit Cost in their respective fields.
Enter a Description for this item in the Description field.
Enter the Vendor Item #, if available.
Enter the Warehouse
#, if available. Click the  button to search for the item.
o If a Good, it defaults to taxable.
o If Service, not taxable.
Enter Discount % if a discount applies for this line. (If a discount applies to the entire requisition, you can wait and enter in on the final screen.)
Enter a Recycle code, if applicable.
o All of these values can be edited.
Click
the  button
to add another line to this requisition. A new detail screen
will appear.
button
to add another line to this requisition. A new detail screen
will appear.
When adding lines to a Requisition, you can use the + key on your keyboard to add a new line instead of having to tab or mouse to the Add button on the screen.
Enter the second line of the requisition and enter details for this line.
Continue to add more lines as needed.
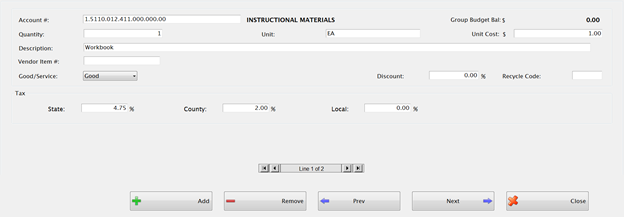
If the Requisition has multiple lines, you can use the line scroll bar to change to and edit a different Requisition line.
Click
the  button
to remove the selected line from the Requisition.
button
to remove the selected line from the Requisition.
Click
the  button
to take you back to the first screen for this Requisition.
button
to take you back to the first screen for this Requisition.
Click
the  button
to go to the totals screen after all the lines have been entered.
button
to go to the totals screen after all the lines have been entered.
A warning message will appear if any accounts are over budget.
This screen summarizes everything that has been entered on this Requisition.
Any account that is over budget will be displayed in red font and this message will appear:

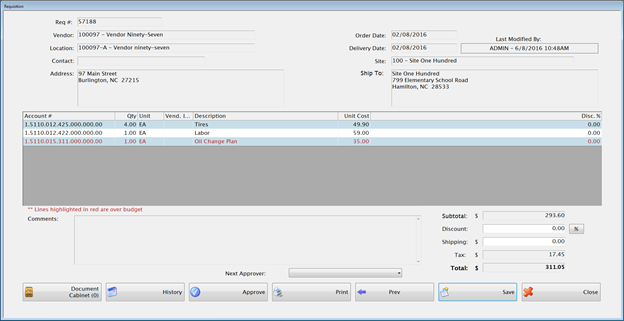
Enter a percentage or amount in the Discount field if a discount applies to the entire requisition.
Enter shipping charges in the Shipping field, if applicable.
The Tax will automatically calculate based on the detail lines entered.
The Total will automatically calculate.
Select a Next Approver from the dropdown.
The Document Cabinet is available to upload or scan related documents. Whatever is uploaded to a Requisition will stay attached even after the Requisition becomes a Purchase Order.
There is a Section to tag items that have been uploaded or scanned so that they will be attached to the Purchase Order when it is emailed.
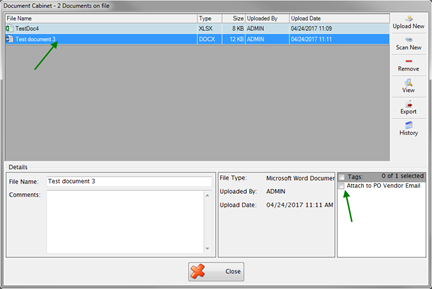
The History button shows Invoice History, Approvals, Auditing, and Journal Entries.
Click Approve to approve the Requisition. Each requisition must be Approved by a user with Approval Level 5 in System Management in order to create a Purchase Order. An approval with less than level 5 just indicates that they have reviewed the Requisition.
 NOTE:If
you have approval level 5, you can click Approve to save and approve
the Requisition at the same time.
NOTE:If
you have approval level 5, you can click Approve to save and approve
the Requisition at the same time.
The Requisition # will automatically be assigned when saved.
©2019 EMS LINQ, Inc.
Fund Management, revised 03/2019