This is where you print checks and process EFTs (Electronic Fund Transfers), and process Virtual Card Payments.
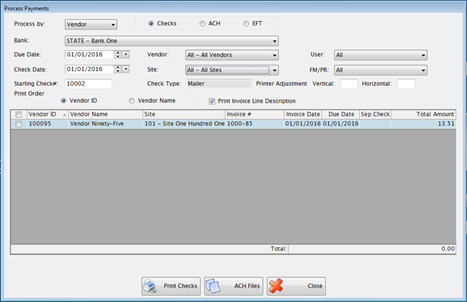
Complete the following form to process payments:
Select Vendor or Employee from the Process by: dropdown.
Select a Due Date from the Due Date field.
Select a Check Date from the Check Date field.
Enter a number in the Starting Check # field.
Select a Vendor from the Vendor dropdown list.
Select a Site from the Site dropdown list.
The Check Type field is populated with the type that is entered for Check Type under Admin: Banks.
Select Check or EFT by clicking the button next to the appropriate one.
Select a user from the User dropdown list.
Select Fund Management Invoices, Payroll Invoices or All from the FM/PR dropdown list.
If the information does not align on the print form correctly, enter an amount to adjust by in the Printer Adjustment boxes. The print can be adjusted up to ¼” in any direction. To adjust up or left, use (-) in front of the number.
Select Vendor ID or Vendor Name to sort the order for check printing.
The Print Invoice Line Description box will be checked by default. Only uncheck if you do not want the line description printed under the account number.
Check the boxes of the Invoices to be Paid.
Checks
Click Print Checks to display a preview listing of the checks to be printed. This can be printed but is not required.
o If there are multiple invoices for the same vendor but different locations, it prints separate checks for each location even if the address is identical.
o If there are multiple invoices for same vendor/location they are combined on one check unless you indicate Separate Check when the invoice is originally entered.
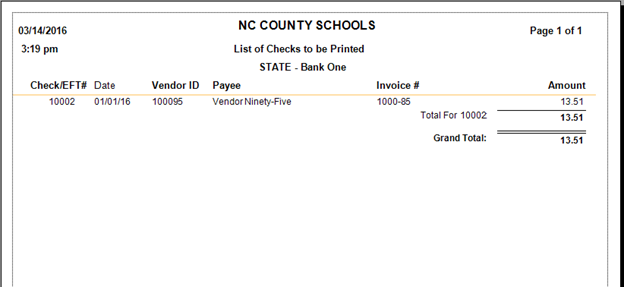
NOTE: Thiswill print the vendor name (in the Payee column) that prints on the check. If the vendor is set to use the location name on checks in Vendor Setup: Locations tab, the location name will print on this report. Also, the Vendor code will display after the vendor name on check copies (only).
When you close the preview screen, an option to Print Checks will appear.
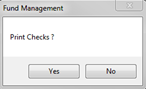
Click No if you want to cancel the check printing.
If you click Yes, a dialog box will appear to send the checks to the printer.
The following confirmation screen will appear.
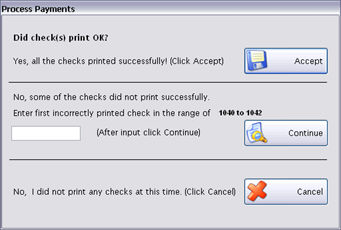
This screen allows you to either continue the process or handle printer problems such as a paper jam.
If the checks all printed successfully, click Accept to update the check data.
If some checks printed correctly but not all of them, enter the number of the first incorrect check and click Continue.
If no checks were printed, click Cancel. The failed check run will be logged for auditing purposes.
 NOTE: Invoices
with zero dollar lines will be marked Paid after the check is written.
Any zero dollar lines will be marked inactive.
NOTE: Invoices
with zero dollar lines will be marked Paid after the check is written.
Any zero dollar lines will be marked inactive.
 NOTE:Only
one user can access Process Payments at a time to prevent duplicate check
numbers from
being used. This also applies if another user is currently processing
checks/direct deposits in Payroll.
NOTE:Only
one user can access Process Payments at a time to prevent duplicate check
numbers from
being used. This also applies if another user is currently processing
checks/direct deposits in Payroll.
The payable check copies are found in Archived Reports if archiving is available.
A copy of the check is in the invoice’s Document Cabinet.
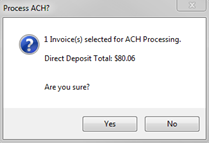
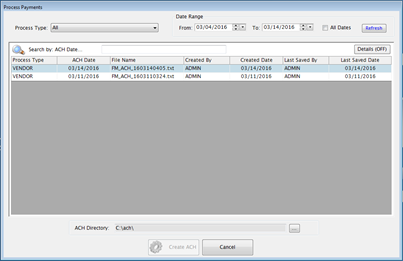
ACH
EFT
Virtual Card Payments
The Virtual Card Payments to be Processed report is displayed.
Select the necessary processed files. The files can be resent to the ftp, saved to the local pc, and printed.
The processed invoices are marked as paid.
©2019 EMS LINQ, Inc.
Fund Management, revised 03/2019