Journal Entries
Journal Entries allows users to create, void, copy, and export journal entries.
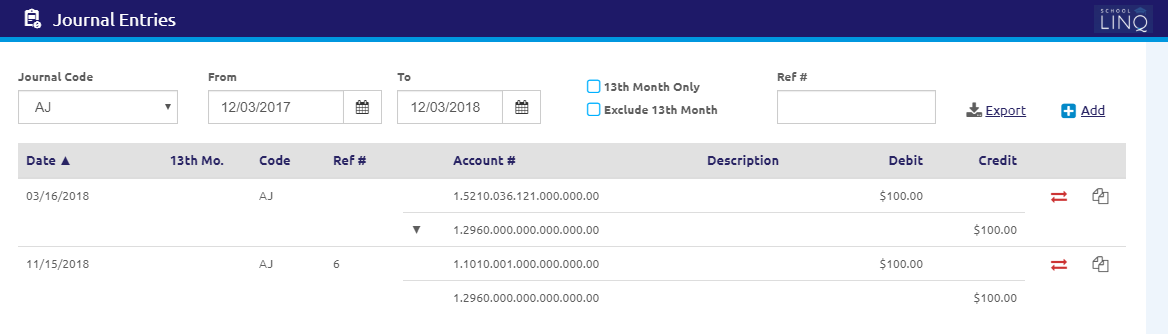
Search and Edit
- Select a code from the Journal Code drop-down list.
- AJ = Adjusting Journal Entry
- BJ = Budget Adjustment
-
Enter or select a date range using the Calendar feature in the From and To fields.
- Check the 13th Month Only check box to filter by 13th Month selections only.
If checked, the Date Range fields are replaced with a Fiscal Year drop-down list.
- The Fiscal Year will default to the current fiscal year but can be changed.
- Check the Exclude 13th Month check box to exclude all 13th Month entries.
This option is selected by default.
- When unchecked, 13th Month entries will display, along with regular entries if the date range filter includes 6/30.
- Enter a reference number in Ref # field.
- To see the full description, hover over the Description field.
- Click the
.png) link to export the data to an .csv file.
link to export the data to an .csv file. - Click the
 button to copy/duplicate entries. The Add Journal Entries form will display.
Add Journal Entry
To fill out the Add Journal Entry form, users can Manually Enter Entry Information, Retrieve Saved Entry, or Import Entry.
- Click the
.png) link. The Add Journal Entries form will display.
link. The Add Journal Entries form will display.
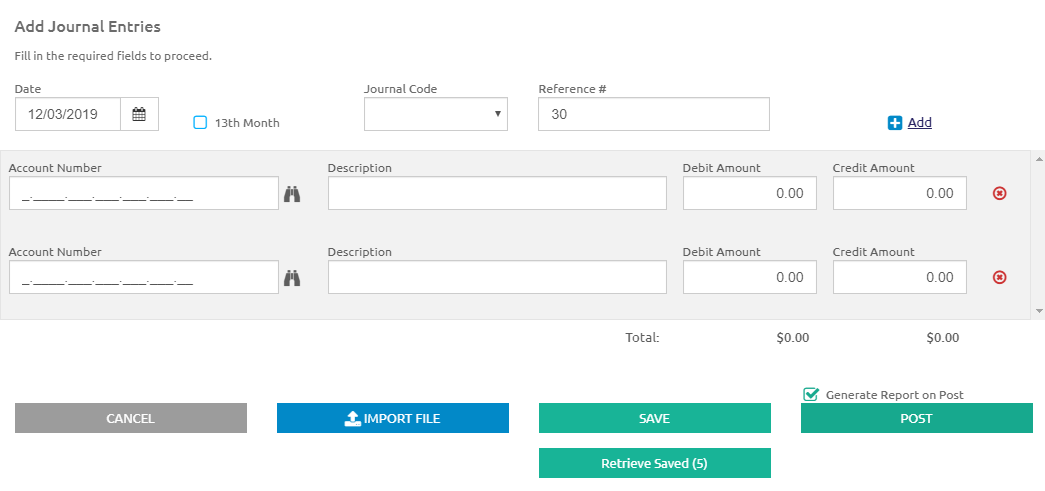
Manually Enter Entry Information
- Enter or select a Date using the Calendar feature, or check the 13thMonth box if this is a 13th Month journal entry. A warning message will display if the Effective Date is not in the Current Month.
- Select a code from the Journal Code drop-down list.
- If necessary, click the link to add a new line to the journal entry.
- Enter the Account Numbers, Descriptions, Debit Amounts, and Credit Amounts in their respective fields. The debit and credit totals will be recalculated as you enter the amounts and displayed in red if they do not balance.
- Check the Generate Report on Post box to automatically generate a Journal Entry Report when the
 button is clicked.
 - Click the
 button to save the journal entry in progress and retrieve it later. A saved entry does not affect the accounts. It must be retrieved and posted in order to hit the general ledger.
 - Click the button to post the journal entries to the general ledger.
Retrieved Saved Entry
If a Journal Entry was previously entered and saved, a  button will display below the button. Click this button to retrieve an entry and make changes to it, then post it or save it again. You can also delete saved entries from this screen, as needed.
Import Entry
- Click the
.png) button. The Import Journal Entries form will display.
button. The Import Journal Entries form will display.
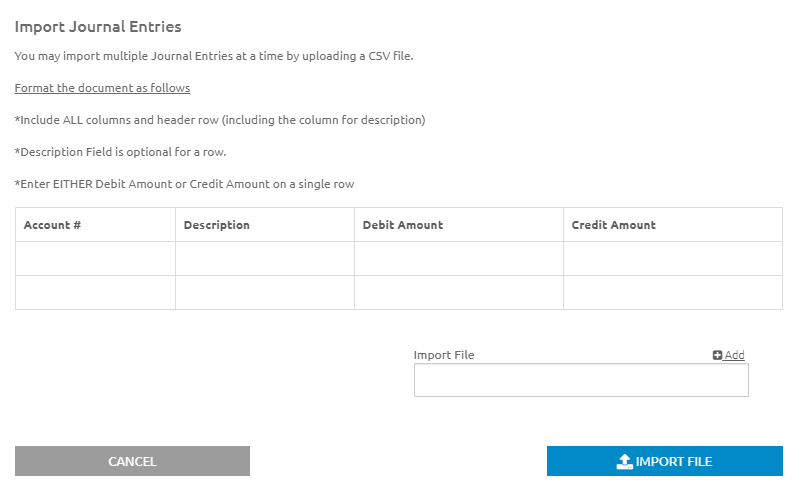
- Click the Add link to browse to a location of a file to import. The file must be a .csv (comma separate) file and in the file format displayed on the screen to import.
- Click the
 button to attach the file.
 - Click the button.
Void Entry
- Click the
 icon. The Void Entry form appears.
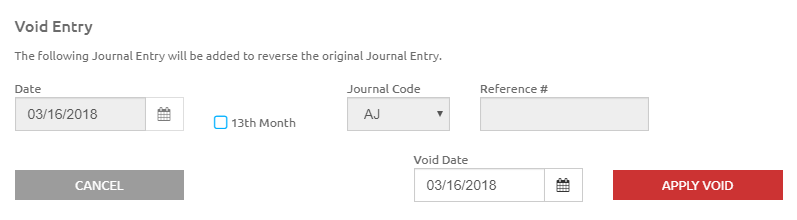
- The Void Date will default to the date of the original journal entry but can be edited.
- Click the
 button. A confirmation message will display. A warning message will display if the void date is not in the current month.
 - Click the
.png) button to confirm the request. Debits and Credits must be equal. New reversing entries are created.
button to confirm the request. Debits and Credits must be equal. New reversing entries are created.
©2021 | EMS LINQ, Inc.
School LINQ Help, updated 01/2021