Letter Setup
You can customize the district's Student Eligibility letters, including Account Balance, Notification, and Verification letters.
Click on the action you want to perform:
Set up a letter template
Modify an existing template
Set up additional languages
Set up a Letter Template
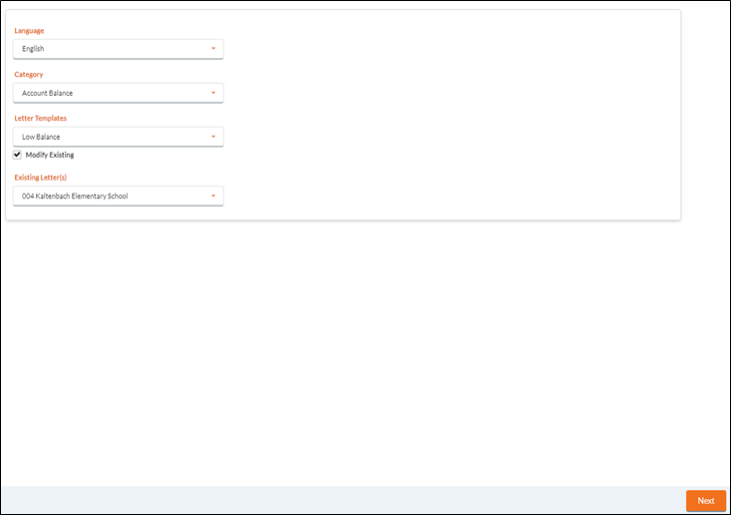
Complete the following form to set up consistently used letters:

- Select a language from the Language dropdown list.
- Select Account Balance, Notification or Verification from the Category dropdown list.
- Select a letter from the Letter Template dropdown list. The list will be filtered based on your Category selection.
- Click the Next button.

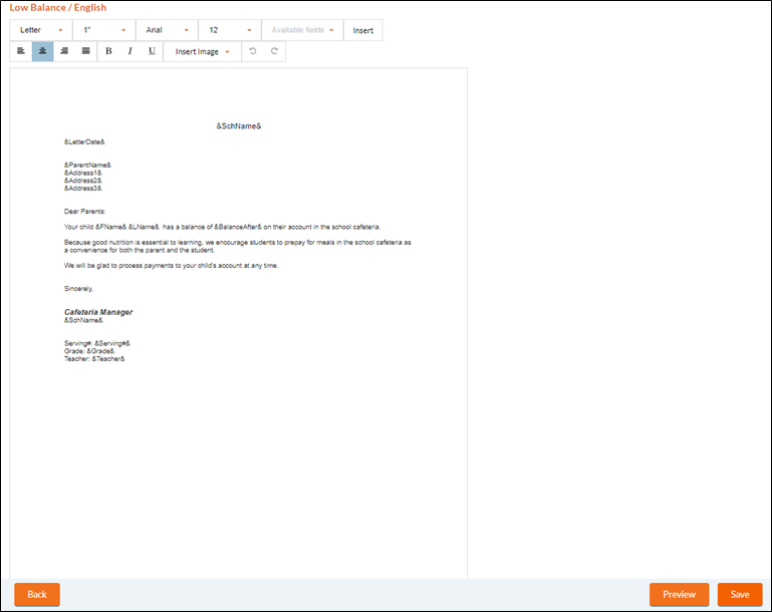
ADD, CHANGE OR DELETE THE TEXT TO CUSTOMIZE YOUR LETTERS

- To use the formatting toolbar, select the area you wish to edit and click within the toolbar. Include the ampersands if you are formatting one of the inserted fields.
- You can also use standard keyboard shortcuts after selecting text: Ctrl+C = Copy, Ctrl+V = Paste, Ctrl+X = Delete, Ctrl+A = Select All
- Choose the desired Margin settings.
- Select Letter (8 1/5 x 11) or Legal (8 1/2 x 14) from the Letter dropdown list.
- Click the
 button to see a preview of the letter format.
 - From the preview screen, you can use the
 icon to print the letter.
- When a letter is printed, a prompt will appear asking you if you want the letter information added to the Letter History.
- Click Yes to add it, or No to keep it off the Letter History.
- When a letter is printed, a prompt will appear asking you if you want the letter information added to the Letter History.
EDITING THE TEMPLATE
- the ampersands [&] in the letter text indicate where it will insert information from the database.
-
The dollar signs [$] in some of the Verification Results letters are place holders where you need to enter meal prices into the letter template before the letter is run.
-
Any of the fields listed in the Available Fields dropdown may be inserted into the letter from the database.
- Position the cursor at the place where you want to insert the field.
- Select the Field from the dropdown list and click Insert.
- Click the
 button to insert an image into the letter. This image can be a logo or a signature (as an example). There are two ways to insert an image:
- By URL
- Upload from computer
- By URL
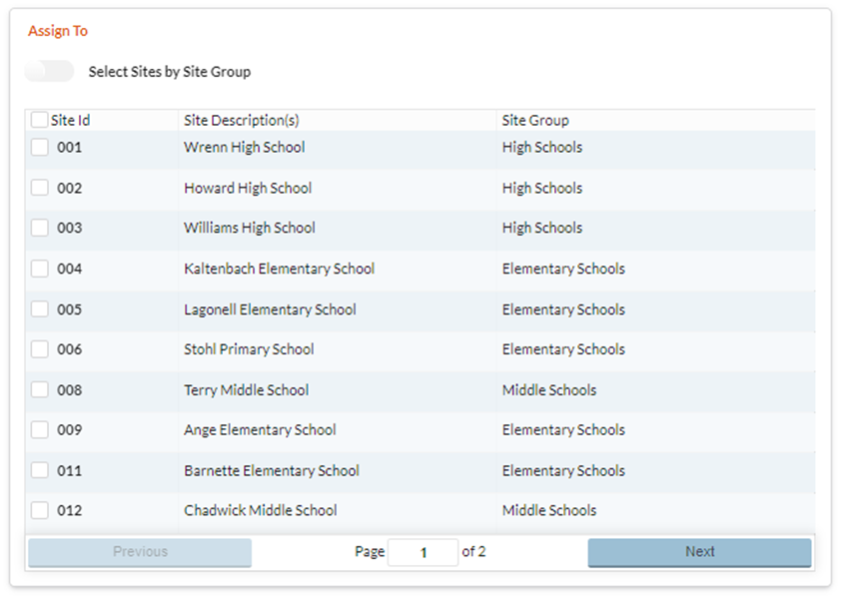
- Once the letter is set up, you can assign it to the appropriate Sites.

- To select by Site Groups, use the toggle for Select Sites by Site Group.
- Check the box for each Site that should have access to this letter.
- Click the Save button.
Modify an Existing Template

- Select a language from the Language dropdown list.
- Select Account Balance, Notification or Verification from the Category dropdown list.
- Select a letter from the Letter Template dropdown list. The list will be filtered based on your Category selection.
- Check the Modify Existing box.
- Select the existing Letter from the Existing Letter(s) dropdown list to open a Letter that was previously saved.
- Click the Next button.
- Click the Save button to save any changes.
Set up Additional Languages
Sample letters are provided in Spanish. If you want to use another language, you will need to enter the translated text for all the letters used with that language.
- If a specific letter has not been set up, it will use English by default.
- You will also need to set up the corresponding Language table for each additional language.
- In order for the letters to send correctly, the language needs to be set up for the students' Head of Household in Manage Application.
©2021 EMS LINQ Inc.
Meals Plus Web Help, 10/2019