Site Setup
Sites can be imported using an Excel file using Import Sites, and Assign Licenses.
This is where the user can add shipping and billing addresses, serving configurations, charge limits by status, warehouses/kitchens, assign users to sites and delete sites.
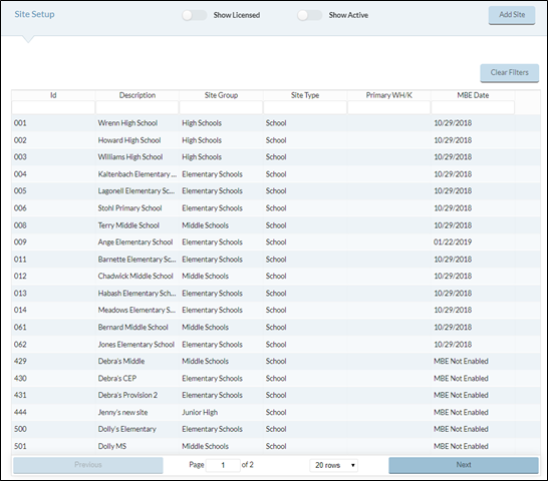
The form displays a list of all the sites that are licensed to use Meals Plus Web.
- If you want to see only Licensed Sites, click the Show Licensed toggle button at the top of the form.
- To display only Active Sites, click the Show Active toggle button at the top of the form.
ADD A NEW SITE
- Click the
 button to add additional sites.
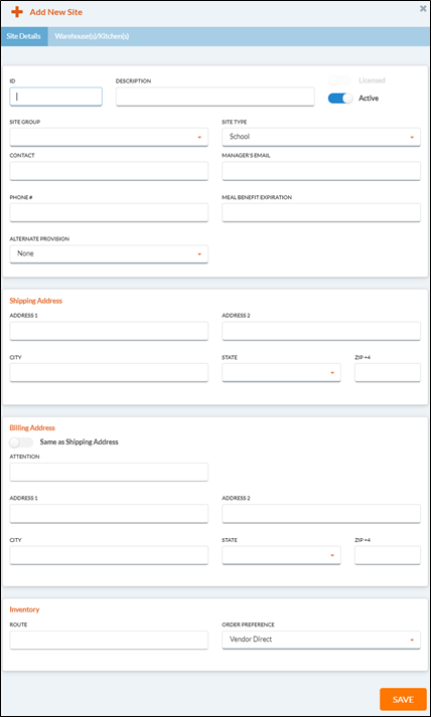
Site Details Tab
This tab is where the user can add shipping and billing addresses, among other site information.
- General Information
- Enter a Site ID in the ID field.
- Enter a school/site name in the Description field.
- To make a site inactive, toggle the Active bar.
-
Select a site group from the Site Group dropdown list. If you make changes here when you are in Edit Mode, it may affect other Meals Plus features.
-
Select School, Warehouse or Kitchen from the Site Type dropdown list. It is usually a school, but for Inventory it can also be a Kitchen, Warehouse or any additional warehouses.
- Kitchens behave slightly differently than warehouses; kitchens allow usage, whereas warehouses do not.
- Enter the site's contact name in the Contact field.
- Enter the manager's email address in the Manager's E-mail field.
- Enter a number in the Phone # field.
- The Meal Benefit Expiration field displays the MBE date based on the calendar selected from School Calendar.
- If the site participates in a provision program, select it from the Alternate Provision dropdown list. If not, leave the default to None.
You will not be able to serve under CEP or Provision 2 unless an alternate serving type is selected here. This ensures the site is set up correctly so verification will be correct.
- The current options are:
- Prov2 Base
- Prov2 NonBase
- CEP
- NSLP and SBP Alt
- NSLP or SBP Alt
- Prov2 NonBase Breakfast Only
- Shipping Address
-
Enter the shipping address of the school/site in the Address 1, Address 2, City, State, and Zip fields.
-
- Billing Address
-
Toggle the Same as Shipping Address bar if the Billing Address is the same as the Shipping Address. If not, fill out the following fields:
-
Enter the manager’s name in the Attention field.
-
Enter the billing address of the school/site in the Address 1, Address 2, City, State, and Zip fields.
-
-
- Inventory
- Enter a route number in the Route # field to summarize warehouse deliveries based on truck routes.
- This Route is for the majority of your orders. The Route # for your Staples Delivery is available on the Warehouse(s)/Kitchen(s) tab.
- Enter a route number in the Route # field to summarize warehouse deliveries based on truck routes.
 WHAT IS STAPLES DELIVERY
Staples Delivery is a feature for districts that use Orders by Serving Date. This enables them to create an order for the week but have different delivery dates depending on the items. The school only has to create one order and the Kitchen/Warehouse knows when it needs to deliver specific items based on the selected Staples Delivery day, Storage Location, and Staples Route.
- Select an order preference for the site from the Order Preference dropdown list.
Select Vendor Direct if your inventory items always come directly from a vendor. This is the default setting.
Select Warehouse/Kitchen if available if your inventory items come from a Warehouse or Kitchen if available, with any remaining items being ordered from a vendor.
Select Warehouse/Kitchen available if your inventory items come from a Warehouse or Kitchen, and any unavailable items are put on a backorder.
- Warehouse(s)/Kitchen(s) Tab
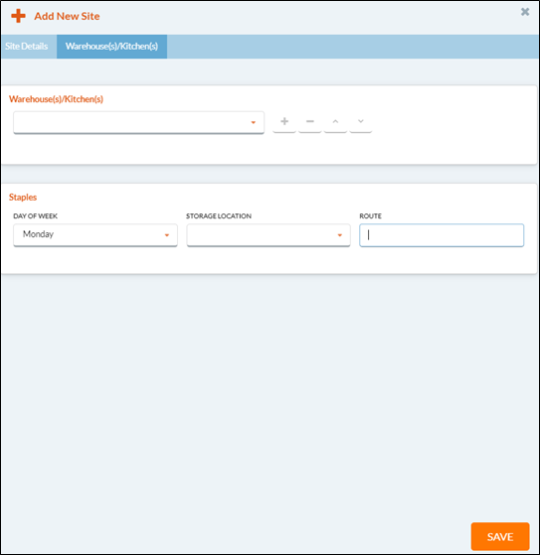
This tab allows you to assign a kitchen and/or a warehouse to sites.
The first Warehouse listed is the warehouse that is used for automatic Warehouse Orders.
Warehouse(s)/Kitchen(s)

-
Select a kitchen/warehouse from dropdown list and then click the
 button to add a kitchen/warehouse to the site. Repeat until you have the desired about of kitchen(s)/warehouse(es) in the grid assigned to the site selected in the grid.
-
If the order preference is Warehouse/Kitchen, a warehouse or kitchen must be assigned to the site.
-
Any inventory item that is in the warehouse and not already reserved for a delivery will be pulled if there is a school order for it.
-
Some school districts contract with a vendor to provide storage and shipping of warehouse items.
-
Other warehouses can be used as processing or storage sites.
-
Transactions (such as Receiving and Transfers) can be entered for these warehouses but there are no automatic transfers from school orders. Example: If a commodity item is to be processed into another item, it can be received or transferred into a Processing warehouse until it is available for use in the cafeterias.
-
- Click the
 button to remove a Kitchen/Warehouse from the site.
Only kitchens/warehouses that are not tied to any active orders can be deleted.
If all Warehouse(s)/Kitchen(s) are deleted, all sites will be set to Distributor Only for their Order Preference. If a Warehouse/Kitchen is added back, the Order Preference will need to be manually changed for each site. It will remain Distributor Only until it is changed by the user.
- Click the
 buttons to set the priority on the Kitchen/Warehouse.
Staples
The Staples section is where you can set up delivery options for inventory items that can be defined as ‘dry goods’ or ‘pantry’ items. These items will be delivered on the same day every week, be stored in the same storage location, and have a different truck route than your other orders. The school only has to create one order and the Kitchen/Warehouse knows when it needs to deliver specific items based on the selected Staples Delivery day, Storage Location, and Staples Route.

-
Select the day the of the week you want the Staples order delivered from the Day of the Week dropdown list.
-
Select the storage location for the Staples order from Storage Location dropdown list.
- You may want to create a separate storage location just for the Staples Delivery items in Storage Location Setup.
- Enter the truck route for the Staples order in the Route field.
- This is different than the truck route on the General/Shipping Address tab.
NOTE: These fields are not required; however, if one is selected, the other two must also have selections.
- Click the Save button.
EDIT SITE
- Hover over a Site and click the
 Cog Option that appears to Edit, Assign Users, or Assign Served Items.
Site Details Tab
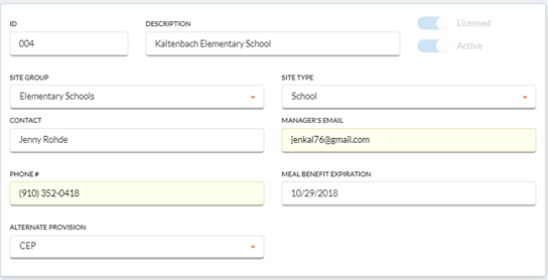
- ID is established in Assign License and cannot be edited here.
- Description is the school name; it can be edited. Any changes will affect all Meals Plus features
Enrollment
The Enrollment section displays the current number of Free, Reduced and Paid accounts at the selected site.

- Free is the number of status 2 accounts, Reduced is status 3, and Paid is status 4.
- It does not include withdrawn (status 5) students or adults.
- Click the Save button when complete.
Serving Configuration Tab
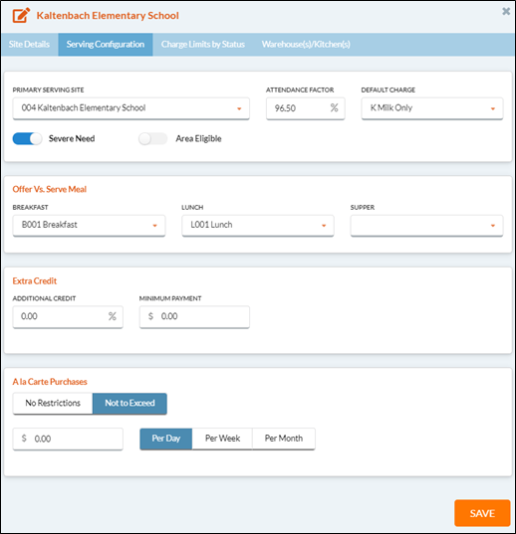
This is where you set up the default settings for Serving Sites, Charges and A La Carte restrictions. This determines what students can charge once their account has reached $0.00.
Default settings will be used in all serving screens for accounts that do not have customized settings. Defaults are set by Site but can be edited for individual accounts in Account Setup.
-
After a new site is set up, the Primary Serving Site dropdown will default to the actual Site but can be changed in Edit Mode.
-
If this is a site that operates within a multi-school cafeteria, then one school is designated the serving site and any other schools are attached that site as secondary sites.
-
 WHAT IS A SERVING SITE
-
A serving site is a cafeteria that serves meals for one or more schools. In a multi-school cafeteria, only one school is designated as the Serving Site. Other sites can be attached as secondary sites.
-
Students can go through any cashier’s line.
-
All the associated sites are combined into one daily deposit report.
-
The individual schools’ meal counts and charges/prepays are still kept separate for reporting Participation (meal counts), Receipts and Collections, and various other serving reports.
-
Generic transactions, visiting students and over/under amounts always go to the serving site.
-
-
-
- Enter the attendance factor in the Attendance Factor field.
-
Default Charge sets the default charge status to be used when importing new students. This determines what items can be charged. The Default Charge options are:
- M = Meals Only
- K = Milk Only (one milk charge per student for a serving session)
- B = Both Meal and Milk (one meal charge and one milk charge per student for a serving session)
- Y = Allow Charges
- N = No Charges
- Toggle the Severe Need / Area Eligible bars if the school qualifies for these programs.
- Serve need is a part of the School Breakfast Program. Please the USDA's website for requirements.
Area Eligible is a part of the National School Lunch Program After-school Snack Service. Please see the USDA’s website for information and requirements.
Offer vs. Serve Meal

-
Select Breakfast, Lunch and Supper options from the Breakfast, Lunch and Supper dropdown lists for Offer vs. Serve Meal.
Extra Credit
The Extra Credit for Prepayments feature allows you to give extra credit for prepayments that are over a specified amount. The credit will be applied automatically whenever a qualifying payment is made when serving Breakfast, Lunch, Other Items or Serve by Teacher.

-
If you do give extra credit, enter the Additional Credit percentage and Minimum Payment here.
-
If there is a balance due on the account, the extra credit will be based on the prepayment amount after the charges are paid off.
-
If someone makes a payment and purchase at same time, the extra credit is calculated before the purchase is deducted.
-
Example: If the Additional Credit % is set to 5, and the Minimum Payment amount is set to $100, and the parent makes a $120 payment to their student’s meal account, they’ll receive a 5% additional that will be added to the student’s meal account.
-
A La Carte Purchases
A La Carte Purchases sets the default A La Carte restrictions to be used when importing new students. If you set the A La Carte Purchases restrictions here, it will be applied to all new students at that site. To apply A La Carte Purchases restrictions to an individual student, use Account Setup.

-
Select No Restrictions or Not to Exceed.
-
Enter the amount not to exceed in the Amount field.
-
If you select Not to Exceed and leave the amount set to zero, all A La Carte sales will be prohibited.
-
-
You can set a Per Day, Per Week, or Per Month limit for A La Carte purchases.
-
This is for all A La Carte purchases, not just charges.
-
A La Carte refers to anything that does not have nutrition code 1 (type 1 meal).
-
Per Week is Sunday to Saturday. Per Month is the current calendar month.
-
- Click the Save button when complete.
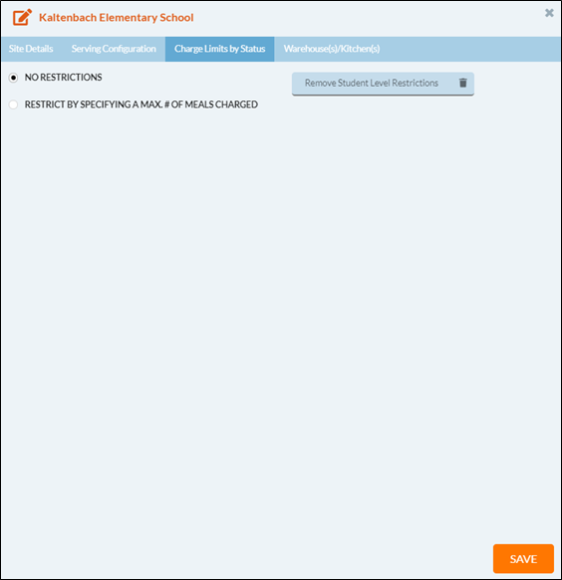
Charge Limits by Status is where you set the site default for the number of meals that can be charged.
-
Select No Restrictions or Restrict By Specifying a Max. # of Meals Charged.
-
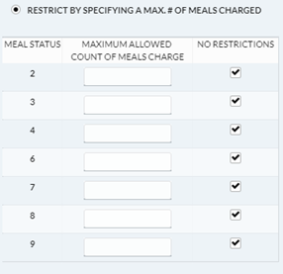
If Restrict By Specifying a Max. # of Meals Charged is selected, enter the Maximum Allowed Count of Meals Charge or meal count for each Meals Status code.
- Click the Save button.
- On Save, it updates all the standard accounts for this site immediately.
-
When serving, you will get a message if the account goes over their limit. You can allow the charge if you have security rights.
-
It will then give an option to delete any customized limits that have been set in Account Setup.
-
When serving, you will get a message if the account goes over their limit. You can allow the charge if you have security rights.
 How Does the Meal Count Limit Work?
-
If the limit is based on the number of meals charged, the program keeps track of how many meals a student has charged.
-
If it goes over the limit it gives an error message on the serving screen. You can allow the charge if you have security rights to override charge limits.
-
The message will continue to appear as long as there is a negative balance on the account.
-
When the negative balance is cleared, the charged count is automatically set back to zero. You can also reset the count manually in Account Setup.
 What's the difference between the Charge Flag, Charge Limit and A La Carte Limit?
-
The Charge Flag determines what a student can charge. Example: if it is set to M (Meals only), they can only charge type 1 meals. There is no override option on the serving screen.
-
If you change the Charge flag, you will get a message on Save asking if you want to update existing students. Click Yes to update, or No to keep their existing charge settings.
-
-
The Charge Limit restricts the amount owed or number of meals charged. If they go over the limit, you will get a message in the serving screen. If you have security rights, you can override the limit and allow the additional charge.
-
A La Carte Limits restrict the amount of supplemental sales they can purchase in a given period. It does not matter if it is a prepaid, charged or cash transaction. There is no override in serving screen for A La Carte settings.
- Click the
 button to remove all student-level restrictions.
ASSIGN USERS
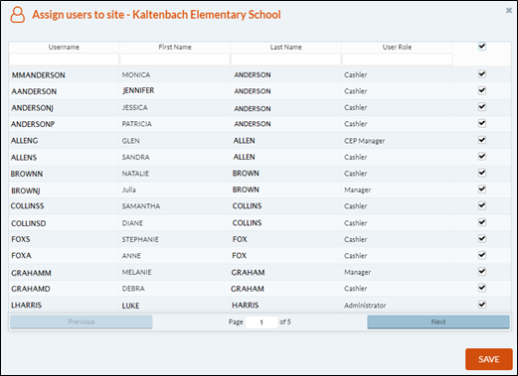
The Assign Users from gives you access to the selected Site.
-
A list off all users appears in the Assign Users window. Check the box in the far right column to select users who should have access to this site, then click Save.
-
Users can also set up Site Access for multiple sites by user name User Setup.
-
-
Click theSave button when complete.
ASSIGN SERVED ITEMS
Assign Served Items is where the user assigns serve items to the site.
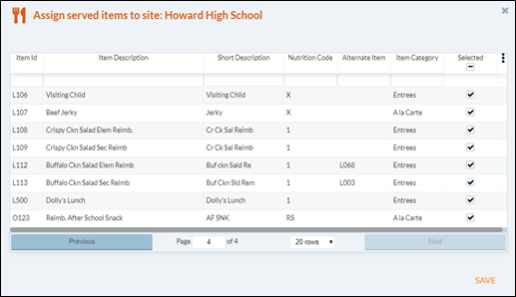
- Check the box in the Selected column if you want the item to display in the Available Items section on the Point of Sale Serve Screen.
- Click the Save button when complete.
©2021 EMS LINQ Inc.
Meals Plus Web Help, 10/2019