Adjustments
Adjustments are used to record all changes to your inventory such as correcting counting errors or entering food loss. Adjustments can be positive or negative to increase or decrease the On Hand quantity.
- Click the
 button to create a new Adjustment.
- Enter the Adjustment Date.
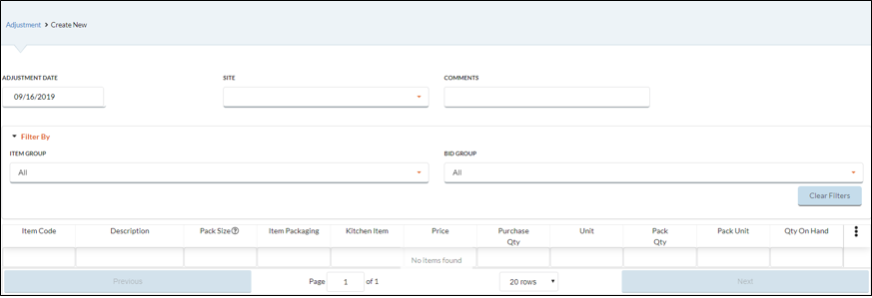
- Select the location that the change will affect from the Site dropdown list.
- Enter any relevant information in the Comments field.
- Purchase Quantity and Pack Quantity are the only fields able to be modified when making Adjustments.
- Purchase Quantity is used to modify the case amount for an Item.
- Pack Quantity is used to identify the quantity remaining in a pack or case.
- Example: A case of beef patties contains 112 patties. Inputting the value .5 under Purchase Qty will yield the same Qty On Hand as inputting 56 under the Pack Qty field.
- Click the Preview Adjustment Items button to review changes you have made.
- Confirm the changes and perform on of the following options:
- Click Previous Page to return to the previous form.
- Click Save Update On Hand and Close if you are finished with the Adjustment and will not need to make any future edits.
- Click Cancel to return to the previous form and cancel any changes.
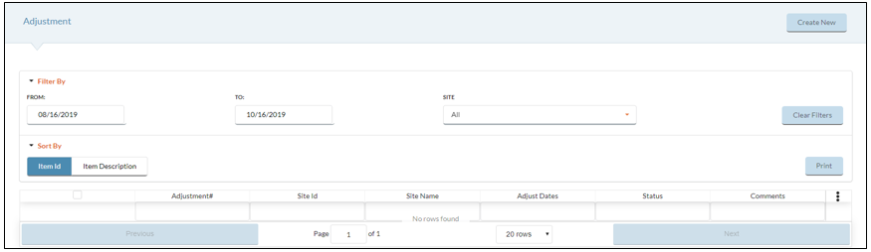
FILTERING ADJUSTMENTS
You can change the Adjustments that appear on the grid by selecting the following Filter By options:
- Select a Date Range.
- Select a Site from the dropdown list.
- Select a View Status.
- Click the All button to display all Adjustments on the grid.
- Click the Open button to display Open Adjustments on the grid.
- Click the Closed button to display Closed Adjustments on the grid.
VIEWING AN ADJUSTMENT
Hover over an Adjustment Group and click the  Cog Option that appears to View existing Adjustments.
PRINTING AN ADJUSTMENT
- Click the
 box to select the Adjustments you want to print.
- You can sort how the Items are organized to print by selecting one of the following Sort By options:
- Select Item Id to arrange Items numerically based on their Item Code.
- Select Item Description to organize the Items alphabetically based on their Item Description.
- Click the Print button.
PRINTING AN ADJUSTMENT
- Click the box to select the Adjustments you want to print.
- You can sort how the Items are organized to print by selecting one of the following Sort By options:
- Select Item Id to arrange Items numerically based on their Item Code.
- Select Item Description to organize the Items alphabetically based on their Item Description.
- Click the Print button.
box to select the Adjustments you want to print.- Select Item Id to arrange Items numerically based on their Item Code.
- Select Item Description to organize the Items alphabetically based on their Item Description.
©2021 EMS LINQ Inc.
Meals Plus Web Help, 10/2019