Add / Edit Recipe
From the Manage Recipes screen, you can add and modify recipes.
Recipe Details
-
Enter a description of the recipe in the Recipe Name field.
-
Enter the Menu Name to appear on ISITE Menus.
-
Select an option from the Meal Category drop-down list. These are based on USDA Nutrition Standards.
-
Enter a brief description of the recipe to be used for marketing purposes in the Marketing Description field.
-
Select a Hazard Analysis and Critical Control Point from the HACCP drop-down list.
-
Select the Serving Temp from the drop-down list.
-
Select Local from the Source drop-down list.
-
Select a recipe Group from the drop-down list.
-
Select an option from the Share With drop-down list, if needed.
-
Select the number of days that the recipe can be held for after serving from the Leftover Rule drop-down list. The default is 3 days.
-
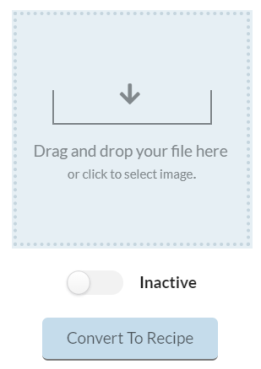
To add a picture to a recipe, drag and drop the file or click the within the field to browse your computer’s files to select an image.
-
To remove a picture, click the
 button.
-
-
To mark a recipeas inactive, click the Inactive toggle.
-
Click the
 button.
-
-
Click the
 button to convert a recipe into an ingredient (e.g., pasta sauce).
-
This is a quick way to convert a recipe to an ingredient so that it can be added to other recipes.
-
The Create / Edit Ingredient form will open.
-
Yield
-
Enter the # of Servings the recipe will yield.
-
Select Lock Batch to disable a user from changing the quantity.
-
Enter the serving amount in the Serving Size field.
-
If the serving size requires an integer amount, select a fraction from the drop-down list.
-
-
Enter the unit amount in the Serving Unit field. Example: A recipe for a bagel would be entered with a Serving Size of 1 and a Serving Unit of Each.
Ingredients
-
Click the
 button to add ingredients to this recipe. The Add Ingredient form will open.
-
Search and filter recipes in the grid.
-
Click the
 icon to add an ingredient to the recipe. You can add multiple ingredients at a time.
 -
Click the
 icon when you have finished adding ingredients.
-
-
Enter at least one value in the Quantity field.
-
Select at least one Measure from the drop-down list.
-
Check marks will display under the columns with icons if the ingredient is used on a menu, has verified allergens, has verified attributes, and is linked to inventory.
-
To delete an ingredient, hover over the ingredient, click the
 icon, and select Delete. Then confirm your choice.
 -
Click the
 button to open the Food Buying Guide for Child Nutrition Programs.
 -
Click the
 button to open the USDA Smart Snacks Product Calculator.
 -
Click the
 button to open the USDA Child and Adult Care Food Program Calculator.
Nutrition Facts Tab
Nutrition Label
The information in this section is based on the nutritional information for each item in the recipe and is scaled to the Serving Size that is entered in the Yield section. These fields cannot be modified.
Meal Component
Meal Components entered for an ingredient will be automatically transferred to the recipe the ingredients are used in.
Allergens
Allergens entered for an ingredient will be automatically transferred to the recipe the ingredients are used in.
Attributes
Attributes can be added and assigned to recipes for organizational purposes.
-
Check the boxes next to the attributes for this recipe.
-
Click the
 button to verify the attributes.
 -
Click the
 button to add an attribute.
Preparation Instructions Tab
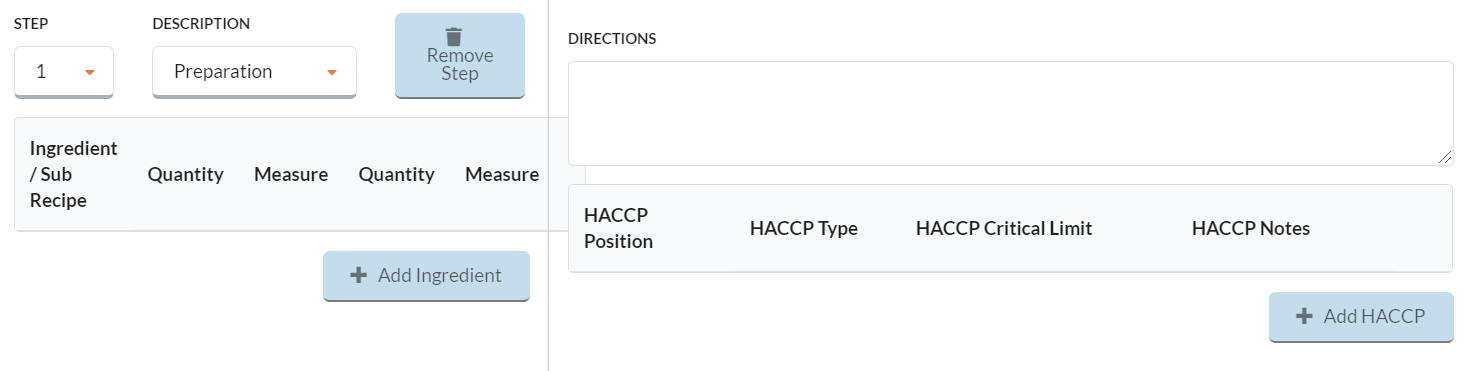
You can include preparation information to your recipe by adding step-by-step instructions. This is optional.
-
Click the
 button.
-
Select a Step number from the drop-down list. You can add up to ten preparation steps.
-
Select an option from the Descriptions drop-down list.
-
Click the
 button to add an ingredient to the step.
-
You can only add ingredients to a step that have already been added to the recipe in the Ingredients field.
-
You can remove an ingredient from a step by clicking the
 icon in the ingredient group.
-
-
Enter directions for the step in the Directions field.
-
Click the
 button, if needed.
-
Select an HACCP Position from the drop-down list.
-
Select an HACCP Type from the drop-down list.
-
Select an HACCP Critical Limit from the drop-down list.
-
Enter any relevant information in the HACCP Notes field.
-
Click the
 button.
-
Moisture and Fat Change Tab
This is where you can enter the percentages of fat/moisture change during preparation that affect the nutrient analysis of recipes.
-
Enter a description in the Cooking Method field.
-
Enter the fat change percent as a positive (gain) or a negative (loss) percent in the Fat Change % field.
-
Enter the moisture change percent as a positive (gain) or a negative (loss) percent in the Moisture Change % field. Moisture changes affect the weight per serving.
- The Per Serving totals on the Nutrition Facts tab will be updated based on the Fat/Moisture changes and the Type of Fat selected.
-
Click the
 button.
-
Click the
icon to add the ingredient as a fat.
-
-
Remove the fat by clicking the
 icon.
icon.
Additional Tabs
The Production, Purchasing, Serving Notes, and Miscellaneous Notes tabs are optional.
-
Type any relevant production, purchasing, and serving notes in these tabs.
Temperature Tab
The values entered here will automatically appear on the Production Report for this recipe.
-
Enter the Cook/Prep Target Temp.
-
Enter the Hold Target Temp.
-
Click the
 button when complete.
©2021 EMS LINQ Inc.
Meals Plus Web Help, 1/2021