Transaction History Report
The Transaction History form is a list of all the purchases and payments that have been entered under Breakfast, Lunch and Other. It also includes records of balance transfers and adjustments from Account Setup.
The Meal Summaries, Daily Deposit and Item Summary all pull from the Transaction History.
- There are three different ways to report the Transaction History: By Item, By Student and By Date. This makes it easy for you to locate the information you need.
Item Numbers on History Reports
-
Purchases will have B (Breakfast), L (Lunch) or O (Other) plus a 3-digit Item number. The descriptions come from Item Setup.
TRANSACTION TYPE
- Select By Item, By Student or By Date for the Transaction Type.
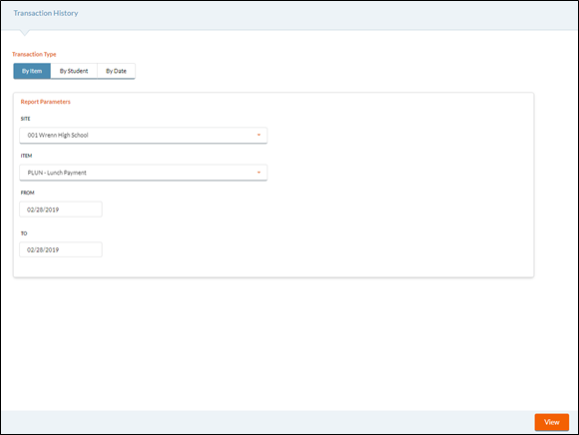
BY ITEM REPORT PARAMETERS
This reports the Transaction History for any Item that you have access to.

- Select the serving site for this report from the Site dropdown list.
- The dropdown list will show all serving sites that you have access to.
- Select an Item from the Item dropdown list.
- Select From and To Dates using the calendar feature.
- Click the View button to open the Transaction History: By Item Report as a PDF.
SAMPLE HISTORY BY ITEM REPORT

History Report Headings (All three reports)
- Stu# is the student # from Account Setup.
- Date is the effective date for the transaction. (This is the date that was entered on the serving screen.)
- Time is the actual time (system time) of the transaction.
- Act. Date is the actual date (system date) the transaction was entered.
- Last Name and First Name are from Account Setup at the time the transaction was entered.
- Serving Site is the site that was selected on the serving screen.
- Status is the account status at the time the transaction was entered.
- User is the name of the user who entered the transaction.
A single transaction will have one or more lines to show the purchases and payments. They will have the same exact date and time. The lines will be grouped together by color coding.
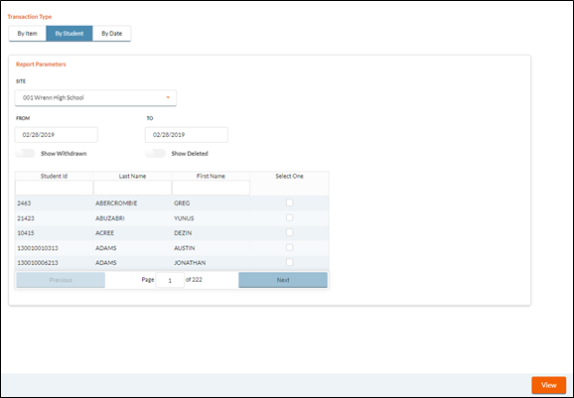
BY STUDENT REPORT PARAMETERS
This gives a history report for a single Student account.

- Select a site from the Site dropdown list (this would be the student's current site assignment in Account Setup.)
- Select From and To Date.
- Use the Show Withdrawn and Show Deleted toggle buttons to show withdrawn or deleted students.
- The grid will display results based on selected filters.
- Select a Student by checking the box in the row of the Select One column in the grid.
- Click the View button to open the Transaction History: By Student Report as a PDF.
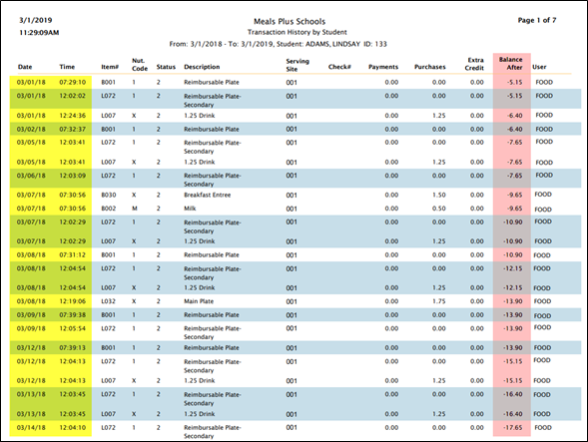
SAMPLE HISTORY BY STUDENT REPORT

- This report lists the transactions in the same sequence that they were entered.
- If the dates on the report appear out of sequence that means the transactions were entered that way. If you need to find the actual date the transaction was entered, it is printed on the Transaction History by Date Report.
- The Balance After column shows the account balance after that transaction was processed.
- If the transaction has been voided, there will be a V next to the payment.

- Column totals on this report are for the date range selected.
- The Account Balance at the end is the current as of the time the report is run. It will not necessarily match the column totals since there may be other transactions that not within the date range of this report.
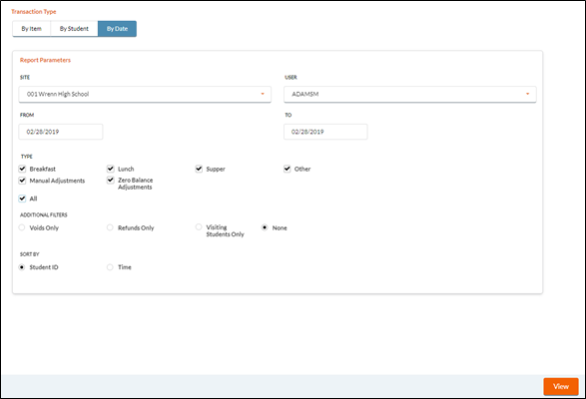
BY DATE REPORT PARAMETERS
This gives a History By Date, and you can filter the report by Meal Type and User.
It is especially useful for resolving discrepancies in the Meal Summary Report.
Example: If you are having problems balancing a cashier's Lunch summary, run it for Lunch Only, for that cashier and date, and it will give all the transactions associated with the Meal Summary.

- Select a serving site from the Site dropdown list.
For meal transactions (Breakfast, Lunch, Other) this would be the Serving Site where the meals were entered.
-
Select All users or a single user name from the User dropdown list.
-
Enter a From and To date for transactions based on the effective date in the Date Range From/To fields.
Type
-
Check the box for Breakfast, Lunch, Supper, Other, Manual Adjustments, Zero Balance Adjustments or All from the Type section.
- For Adjustments, it would be student's currently assigned site at the time of the adjustment.
Additional Filters
-
Check the box for Voids Only, Refunds Only, Visiting Students Only, or None for any additional filters for the report.
Sort By
- Select the Student ID or Time to sort by section.
- Click the View button to open the Transaction History: By Date Report as a PDF.
SAMPLE HISTORY BY DATE REPORT

 HOW CAN I TELL IF IT IS A CASH SALE OR NOT
If money was received, there will be a P (payment) transaction at the exact same time as the purchase. If there is no payment shown, it was a charge or prepay used.
Item Numbers on History Reports
Purchases will have B (Breakfast), L (Lunch) or O (Other) plus a 3-digit Item number. The descriptions come from Item Setup.
Payments will have P plus an Item ID that indicates where the payment was entered.
-
PBRK – Payment made when serving breakfast or in Serve by Teacher with breakfast selected.
-
PLUN – Payment made when serving lunch or in Serve by Teach with lunch selected.
-
PLPP – Payment from k12paymentcenter.com.
-
POTH – Payment made when serving Other Items.
-
PPAY – Payment Adjustment from Account Setup.
-
PPUR – Purchase Adjustment from Account Setup.
-
PTRF – Balance transfer from another site. This is used when there is a transfer in Account Setup and a balance exists, or when a visiting student has prepays or charges at another school. PTRFs do not show on the history screens since they do not affect the balance but they do print on reports.
©2021 EMS LINQ Inc.
Meals Plus Web Help, 10/2019