Manage Timesheets
Manage Timesheets allows administrators to see employee's clock-in/out times and total hours based on the given filters. Administrators can also adjust clock-in/out times if needed, as well as approve timecards to be paid. See the Timesheet Report for the corresponding report.
Users can only approve time for employee jobs that are tied to Timesheet Approval Groups to which the user has access. Users with View/Edit rights can still add and update unapproved time entries; however, they are now unable to approve them. Users with View/Edit rights can approve time for all employee jobs that are not tied to any Timesheet Approval Group.
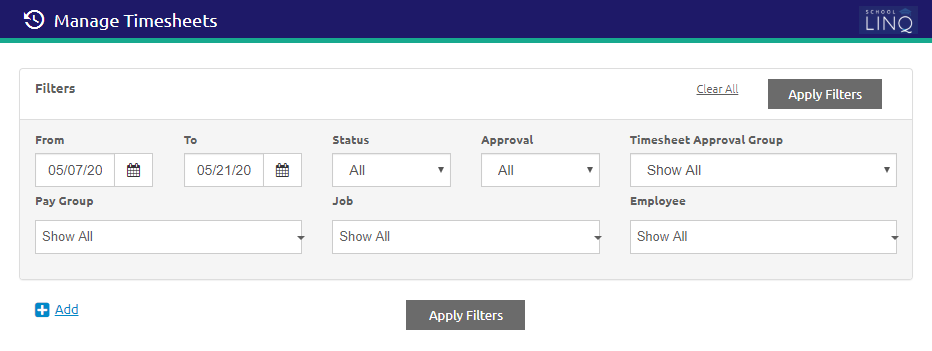
Filters
- Enter or select a date range using the Calendar feature in the From and To fields.
- Select a status from the Status drop-down list.
- Select an approval from the Approval drop-down list.
- Select a Timesheet Approval Group from the Timesheet Approval Group drop-down list. This list only contains the Timesheet Approval Groups that the user has access to.
- Select a pay group, job and employee from the Pay Group, Job and Employee drop-down lists.
- Click the
 button for the grid to display results based on the selected filters.
 - Click the
 link to start over.
Add Time Entry
- Click the
.png) link. The Add Time Entry form will display.
link. The Add Time Entry form will display.
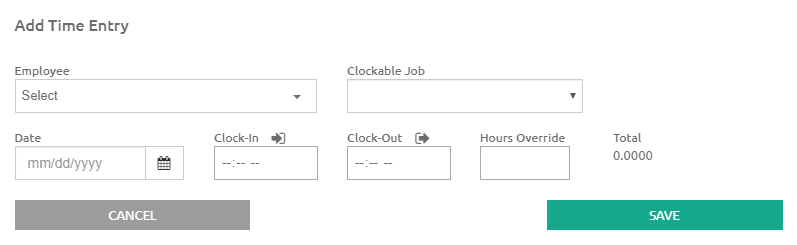
- Select an employee from the Employee drop-down list.
- Select a job from the Clockable Job drop-down list. Jobs available in this list have the Allow Clocking-in box checked in Manage Employees: Jobs.
- Enter or select a Date using the Calendar feature.
- Enter the Clock-In and Clock-Out times.
- Use the Hours Override field to manually adjust the total hours to be paid. This is optional.
- The Total field will automatically calculate.
- Click the
 button. The Time Entry will be added to the grid for the employee.
NOTE: Job clock entries cannot overlap other existing job clock entries for employee, regardless of job. If Round Time to nearest is set to ‘0’ or ‘No Rounding,’ time display will show seconds to the fourth decimal. If Round Time to nearest is set to ‘1’ or ‘5’, time display will show seconds as ‘0’.
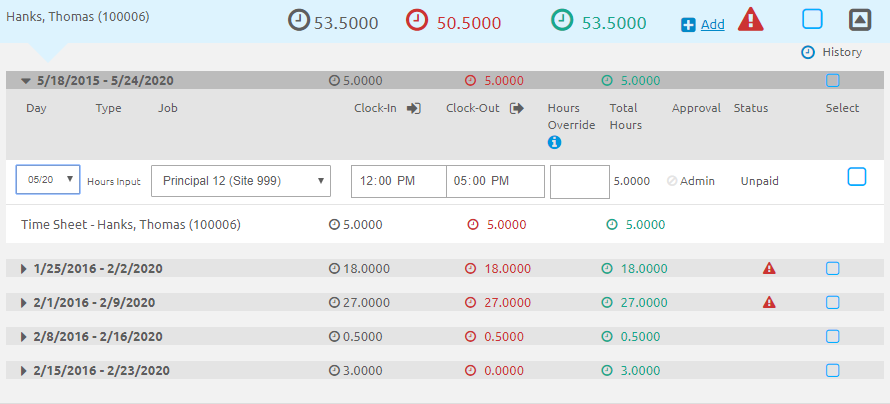
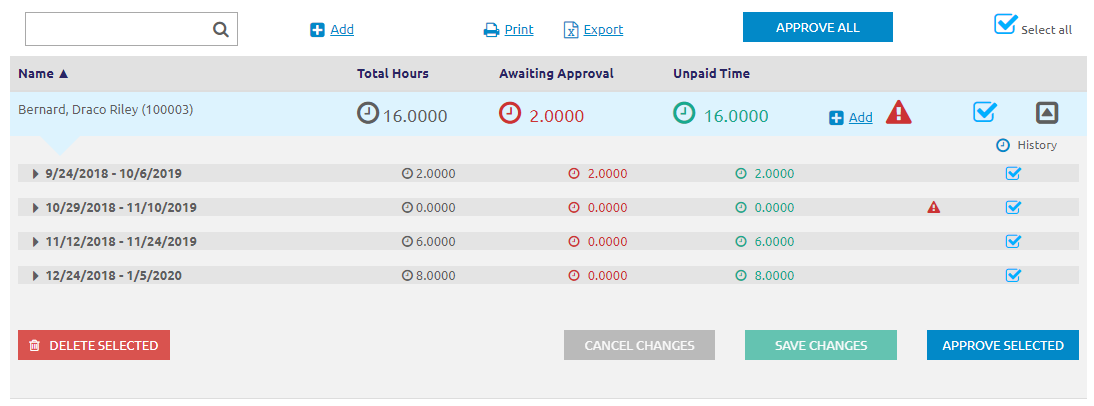
Manage Timesheets Grid
This grid displays a list of employee time entries according the filters applied. Hours and absences entered in the Input module will now display on the timesheet. These entries are not editable and must be edited in Input: Hours and Input: Absences.
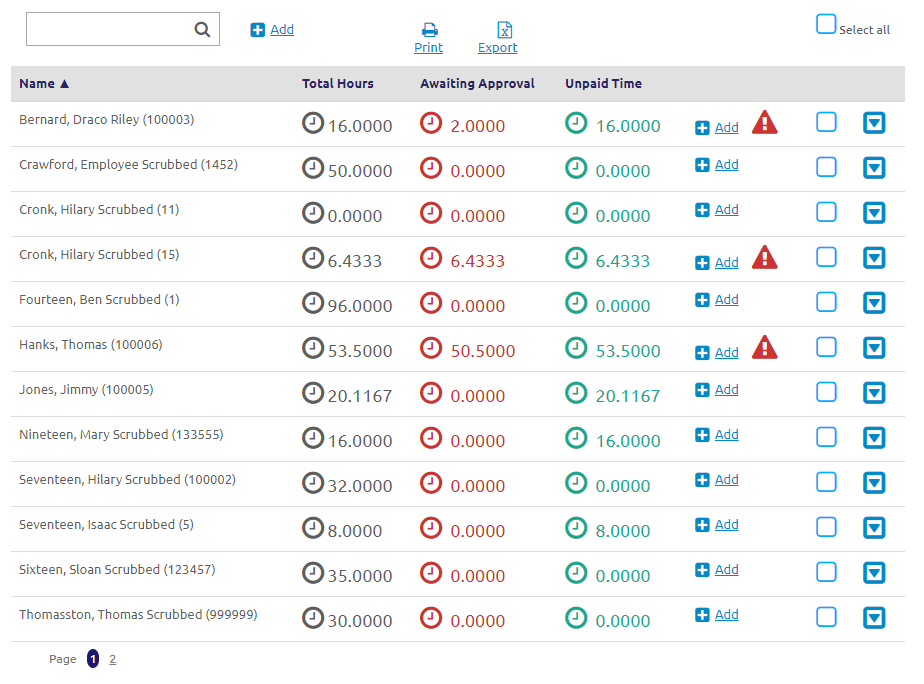
- Click the
 link to create the Timesheet Report.
 - Click the
.png) link to export the data to Excel.
link to export the data to Excel. - Click the
 icon to display additional details on a Time Entry.
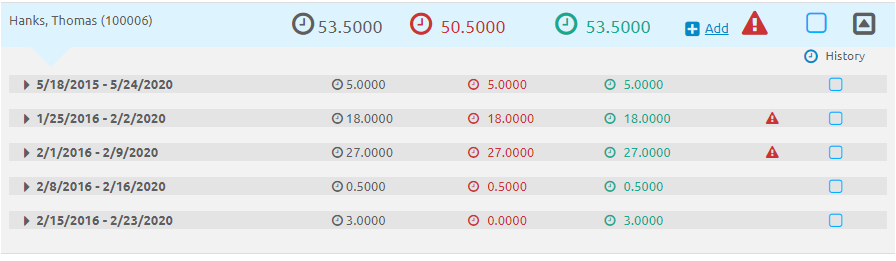
- Click the
 icon to expand additional details.
- Edit the Day, Job, Clock-In, Clock-Out, or Hours Override as needed.
- Click the
 button.
- Click the
- The Type column will display one of three options:
- Clock In/Out - Hours entered in Employee LINQ
- Hours Input - Hours entered in Input: Hours
- LS Hours Entry - Hours entered in Input: Hours in Lump Sum Entry mode
- Absence Input - Hours entered in Input: Absences
- The
 icon indicates that the Time Entry has a pending request, missed clock in, or missed clock out.
- Edit the Day, Job, Clock-In, Clock-Out, or Hours Override as needed.
- Check the
 boxes for all time entries for one employee, or for all time entries for all employees.
- Click the
 button to approve only the selected time entries.
 - Click the
 button to approve all time entries in the grid.
 - Click the
 button to delete only the selected time entries.
- Records can be deleted from timesheets if they are not in Paid status.
- Records with Clock-In/Clock-Out time within two minutes of each other will be automatically deleted.
- Records will not be truly deleted but rather recorded in Audit History.
- These records do not display on the timesheet and are not included in any reports.
- Click the
- Click the button.
Sample Timesheet Report

©2021 | EMS LINQ, Inc.
School LINQ Help, updated 01/2021